Nico McMasters - July 2018
How To Make A Restaurant Menu
TL DR; Jump right in on your first menu, or browse designs.
Call me Homer Simpson. When I'm browsing your restaurant menu, I'm scanning for pork products. "Mmmmmm... pork products." But make a mistake, and you lose me. Amateur menu, you lose me. Confuse me, you lose me. After 10 years of making menus, and 20 years in the industry, I've been working on the system to take the guesswork out, and to make the perfect menu every time.
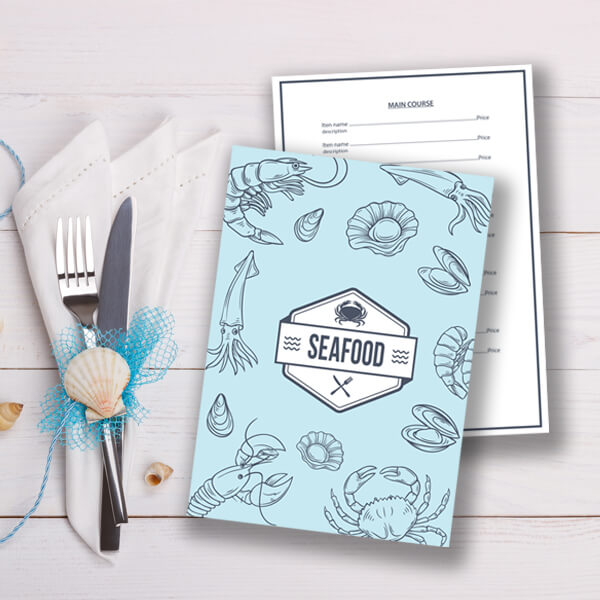
It’s gratifying to see your final menu laying neatly on your restaurant tables, waiting for new, eager diners to pick them up and use them. It’s both a science and an art to create a menu that transmits the right emotional connections from the moment a client sits down. In the article below, we’re going to streamline this creation process for you. Follow along on each section to learn how to make a restaurant menu and take your concept from idea to completion. You can create beautiful menus like this one below, all day long.
Restaurant menu planning
Planning your new restaurant menu can be intensive, and you should plan on taking anywhere from 4 to 8 hours to complete all the steps outlined within. The reason it can be time-consuming is that there are often unknown variables that I'm going to uncover for you, which you need to clear up before you can complete each part of the process.
If you already have an existing menu and are working to refresh it, you’ll be able to run through parts of the process much quicker, mainly because your menu content is already organized in the manner that you like to have it. If you are starting from scratch, make sure you first have a handle on the dishes you will select to serve your diners, and then continue with the first step of this guide about how to create a restaurant menu.
Through this all, we’re going to help you understand the most critical components of your menu, based on the type of establishment you are serving. This will, in turn, help clarify offerings, streamline ordering, and encourage your eaters to take full advantage of your meals.
If you're looking for a design team that you can offload some or all of these steps to, or if you'd like a custom design, you can contact us and we'll give you a quote after we ask you a few questions.
Get started: Register for free
Step 1. Collect and organize your graphics
This relatively simple beginning has a number of caveats to watch out for. To begin with, you should make sure you have organized all of the custom artwork and graphics that you plan to use in your menu in a common folder on your computer or tablet, so they will be easily accessible. These images and graphics will get uploaded to your new restaurant menu design.
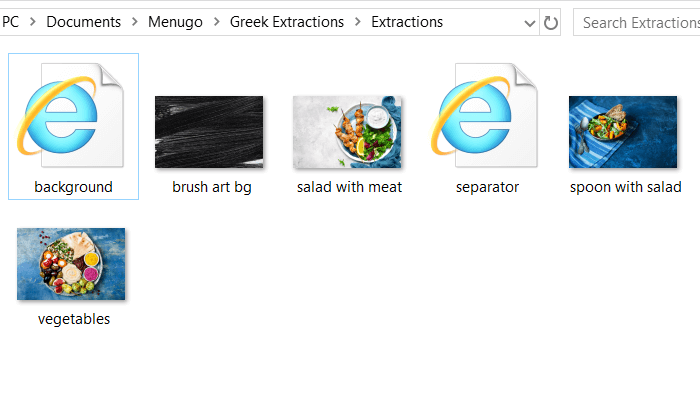
Watch out for low-quality images. When you go to print, you need to make sure that you are using the highest resolution images possible, as this will prevent jagged edges and grainy looking results when printed.
If you find that you have duplicate images, and are not sure which image is the best suited for your menu, check the file sizes of each menu, and try to use the image with the larger file size. In general, this means that the image is of higher quality and will make the best candidate for your menu.
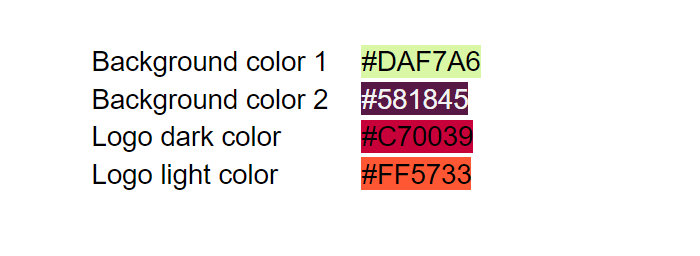
Step 2. Write down your custom color codes
Your brand probably has certain colors associated with it that you use in marketing materials, in your logo, and in the decoration of your restaurant. If you have marketing material that has already been created, or know what color and font type your text should be, make note of it in a place that will be easy to reference later when you start your work in the restaurant menu builder. You need the colors listed below, and you will want them in RGB format (such as #ffffff).
- Text colors
- Background colors
- Logo colors
- Complimentary colors
- Opacity levels (if any)
Step 3. Determine your menu size
The size and type of menu you choose reflects the type of experience a diner can expect to have at your establishment
For casual dining & food trucks
Large, laminated menu pieces work great for family-style and fast, casual restaurants like diners, truck stops, cafes, and pubs.
Try making a one page, wide-menu format with a front and back, which can keep all of your items easily readable. If the number of items on your menu is very great, you will need multiple pages, so instead opt for a multi-page, Regular size menu which will be much smaller in size, but will be easier for your customers to understand and read. These can also be laminated, bound, and treated with beautiful UV coatings. More on that later on.
For high end & boutique eateries
Opt for a Regular size menu and design that is simple, having a textured background, custom fonts, and without photos. You may use simple vector art, like lines and icons.
We usually recommend a cover page for all types of restaurants, as it sets the tone for the experience the customer is about to have. These are included in all of Menugo’s restaurant menu design templates.
All types of establishments will want to use bi-fold takeout menus with beautiful photos to serve takeaway and delivery orders.

Step 4. Consider your prices
Although you’ve probably considered how you want to price your items, there are likely some strategies you might not have thought about, which vary depending on the type of eater you are targeting. When considering how to design a restaurant menu, another aspect to consider is whether you will be using whole numbers or decimals. In general, casual dining should use numbers with decimals, such as “$12.99.” It conveys to that particular type of diner a fair price, and one that has been considered.
For high end or boutique stores, you might have heard that leaving off the price sign, and using whole numbers, like “19,” or “49,” will result in higher average sales. This is not completely true, as the studies have not been reproduced in the wild. However, using whole numbers does indicate a special experience, and can be enticing to eaters who are specifically looking to be catered to. So use “49,” instead of “$49.99,” and your diner will expect to receive worry-free dining experience, and you won’t trigger price analysis in their heads. They’ll relax and have a stress-free dining experience.
Some rules when deciding how to price
- Casual restaurants who want to offer certain customers a special experience should offer upgrades to meals as a part of their pricing. In some restaurant menu examples, you might find “+$6.99 Add Black Angus Beef Slices”
- If you decide to use whole numbers, like “49,” try to avoid upsells. The eater wants everything to be taken care of for them in the price.
Step 5. Choose a design
There are two routes you can go down to get the right design.
A) Choose a menu design from the available themes.
B) Have designers create a custom restaurant menu
If you already have a designed menu, contact us so we can get it imported for you.
There is no right or wrong design for your menu. As noted above, certain styles of restaurants will typically choose a design that will be easily received by their customers. You wouldn't want to serve a circus theme inside of a Michelin rated restaurant. Then again, maybe you would.
Dark themes are often associated with night time, drinks, and an ambiance that is cozy.
Colorful, playful themes are well suited for quick food prep times, like families, or happy hour patrons might expect.
Bright, light menus, are often associated with special events and holidays.
Again, there is no right or wrong menu design for your restaurant, but if you want a style that is easily understood by your eaters, try to stick to the guidelines above.
(Have a creative restaurant menu design that has served your business well? We’d love to see it! Please contact us, or send a message on Facebook Messenger or Twitter)

Browse Restaurant Menu Templates
Step 6. Data entry
For this part, you’ll need to set aside dedicated time to get all of your food items entered. Many restaurants will do this over several days, or outsource the data entry portion, which can also help to prevent data entry errors. After all, you don’t want to print your menus, only to find a spelling error later on that won’t be cheap to change.
How much time?
- 0-20 items per page: 30 minutes per page
- 20-30 items per page: 1.5 hours per page
- 30+ items per page: not recommended
In part, you will find it’s slightly harder to work with menus that have a large number of items, because arranging columns and positions on the page will take slightly more time. Modifying one item could cause the layout to change more substantially, so you will have more back and forth between the data entry, editing, and reviewing times.
Some tips for data entry
There are ways to make your life easier in the future when you need to make updates, or when a colleague will be tasked to update the menu that you have created. You don’t want the menu to break when a new item is added, when descriptions or prices change, or when a graphic is moved. You should try to follow these best practices:
- Never use spaces to align fields, like prices. Instead, use specially designed items and headers that have the exact layout you want. Menugo will be your free menu maker for these. Just contact us!
- Try to keep items together in one grouping. It will make it much easier to move content around from time to time, without breaking the layout across the board.
- Lock your custom text fields in place so that they don’t move easily.
- You can upload multiple images at once. Just select all of the images you want uploaded before you click “Add Image”

Step 7. Print your restaurant menu
Professional printing will make a big difference to the experience of your eaters, compared to printing on your personal inkjet printer. Diners will perceive the quality of your restaurant, food, and service as higher when they feel and see a menu that gives them confidence.
Thick paper and laminates feel the best and last a long time. They make you think about high-quality services and give you confidence when you put your hands and fingers on them.
If you have menus that change often and you want a high class, boutique feel, use a heavyweight feathered paper that is textured. Be warned, these pick up fingerprints and oils very easily, and cannot be cleaned. But they will impress your eaters and make them feel right at home.
Menugo offers professional printing services. You can have your menu printed right from your account, and delivered to your restaurant door in days. Best yet, you can print non-traditional sizes and promotional pieces, and get high-quality papers and finishes, such as UV coatings, laminations, and card-stock.
If you are going to do it yourself, Menugo offers printable restaurant menus, in the form of a production-ready, high-resolution PDF file. You won’t be able to get the same resolution for crystal clear printing from standard editing programs, so we recommend you download from the Menugo site.

Ready to start working on your menu?
It's easy to get started!
Bonus: How can I get my style to match exactly the concept I’m working from?
Do you have a menu concept that you want to match exactly? Do this: take a PNG or JPG copy of the concept file, and upload it to your menu that you are working on. Now expand the image to fill the menu page you are working on, set the opacity to 70%, and now “Arrange -> Send to back.” What you have now is a background of your original menu concept that can be used to guarantee the exact layout you needed to create your own restaurant menu.
With this technique, you should be able to verify all the font sizes, margins, spacing and image placements are exactly how they should be, according to the design you are working from. When done, you simply delete this background image and what you will be left with is the final, working menu that looks exactly like your menu concept.
Bonus: Don’t forget promotional pieces
Upsells and impulse buys are the lifeblood of many restaurants. It’s all about temptation! People who look at menus and promotional items longer, plan for consuming more and are less inhibited when time comes to make another decision.
There are several heavy-hitting tools to accomplish this which are included in each Menugo design.
- Tabletop displays
- Placements
Tabletop displays sit neatly next to the diners, even before and after they’ve placed an order. These are great for happy hour promotions, signature cocktails and drinks, and desert specials.
Placemats are an extra way to keep your table area tidy and clean, as well as to promote your business, or foods you want to tempt clients with. Put your Instagram, Facebook, and Twitter ID’s right on the placemat so when the food arrives, and the selfies start, they know exactly who to tag. It’s great for free marketing!
Bonus: Marketing and Social Media
Your menu is the heart of your business, and the dining experience starts long before a customer ever sets foot in your restaurant.
The feelings, emotions, and expectations that a potential customer goes through happens as soon as they discover you online, and they make snap decisions about you in seconds, like speed dating. Every night, someone new is considering, “should I? Or shouldn't I?” when it comes to dining at your business.
Aside from knowing how to make a restaurant menu, you have to be aware that it says so much about your business. The quality of your service. The professionalism. And not least of all, the deliciousness of your food.
Menugo takes your menu and provides a platform for it to reach all your potential customers through Google Maps and Facebook. You can track customer reviews, upload photos, and promote your business.
Take the first step
We're here to help you make your restaurant menu a success, because we've made the most intuitive restaurant menu maker that's available. Our team of graphic designers and engineers set out to make a menu management platform that was so easy, even a restaurant owner could do it. What we found, is they love to use it. I can't wait to get your feedback, and help you along the process.
Questions? Contact us, or visit us on LinkedIn